Cambridge ALD: Difference between revisions
Jump to navigation
Jump to search
No edit summary |
|||
| (20 intermediate revisions by the same user not shown) | |||
| Line 10: | Line 10: | ||
}} | }} | ||
Two nearly identical Savannah S100-like systems are used for atomic layer deposition of '''aluminum''', '''hafnium''', | ''Page last updated: 15 Jun 2026'' | ||
Two nearly identical Savannah S100-like systems are used for [[atomic layer deposition]] of '''aluminum''', '''hafnium''', '''titanium''', '''zirconium''', and '''oxide'''. | |||
Other material deposition alternatives at the [[Main Page|NBI cleanroom]]: | Other material deposition alternatives at the [[Main Page|NBI cleanroom]]: | ||
| Line 18: | Line 20: | ||
* [[Leica sputter coater]] | * [[Leica sputter coater]] | ||
* [[MBE|Molecular beam epitaxy system]] | * [[MBE|Molecular beam epitaxy system]] | ||
== Available processes == | == Available processes == | ||
| Line 34: | Line 27: | ||
! Deposited material !! Precursor !! ALD1 !! ALD2 !! Ref. | ! Deposited material !! Precursor !! ALD1 !! ALD2 !! Ref. | ||
|- | |- | ||
| Hafnium oxide (HfOx, HfO<sub>2</sub>) | | Hafnium oxide (HfOx, HfO<sub>2</sub>) | ||
| <div class="toccolours mw-collapsible mw-collapsed width:400px" style="width:300px"> TDMAH <div class="mw-collapsible-content">tetrakis(dimethylamino)hafnium <br/> [(CH<sub>3</sub>)<sub>2</sub>N]<sub>4</sub>Hf <br/> [[File:TDMAH.png|246px]]</div></div> | |||
|style="background-color: #c6e0b4" | Yes || style="background-color: #c6e0b4" | Yes || [https://doi.org/10.1016/j.tsf.2005.05.050] | |||
|- | |||
| Aluminum oxide (AlOx, Al<sub>2</sub>O<sub>3</sub>) | |||
| <div class="toccolours mw-collapsible mw-collapsed" style="width:300px> TMA <div class="mw-collapsible-content">trimethylaluminum <br/> (CH<sub>3</sub>)<sub>3</sub>Al <br/> [[File:TMA.png|290px]]</div></div> | |||
|style="background-color: #c6e0b4" | Yes || style="background-color: #c6e0b4" | Yes || [https://doi.org/10.1134/1.1626763] | |||
|- | |- | ||
| | | Titanium oxide (TiOx, TiO<sub>2</sub>) || <div class="toccolours mw-collapsible mw-collapsed" style="width:300px> TTIP <div class="mw-collapsible-content">Titanium(IV) isopropoxide <br/> | ||
Ti[OCH(CH<sub>3</sub>)<sub>2</sub>]<sub>4</sub><br/> [[File:TTIP.png|290px]]</div></div> | |||
|style="background-color: #c6e0b4" | Yes || style="background-color: #e0b4c6" | No || [https://pubs.acs.org/doi/full/10.1021/acs.jpcc.5b10529] | |||
|- | |- | ||
| | | Zirconium oxide (ZrOx, ZrO<sub>2</sub>) || <div class="toccolours mw-collapsible mw-collapsed" style="width:300px> TDMAZ <div class="mw-collapsible-content">Tetrakis(dimethylamido)zirconium(IV) <br/> | ||
[(CH<sub>3</sub>)<sub>2</sub>N]<sub>4</sub>Zr<br/> [[File:CH32N4Zr.png|290px]]</div></div> | |||
|style="background-color: #e0b4c6" | No || style="background-color: #c6e0b4" | Yes || [https://www.osti.gov/servlets/purl/1763732] | |||
|} | |} | ||
== | == Videos on operating the tools == | ||
Video on how to operate ALD 1: | Video on how to operate ALD 1: | ||
| Line 54: | Line 57: | ||
* [https://www.youtube.com/watch?v=GmNEbyMNC4A Click here to watch the video on YouTube] | * [https://www.youtube.com/watch?v=GmNEbyMNC4A Click here to watch the video on YouTube] | ||
== | == Standard Operating Procedure == | ||
===ALD1=== | |||
<div style="background-color: #c0c0c0; border: 1px solid #00000; padding: 10px; border-radius: 5px;"> | |||
====Loading==== | |||
# Log your process in the Excel notebook. | |||
# Check the nitrogen bottle: ''The indicators should be close to the designated values. If line pressure is ~0bar, contact the cleanroom staff.'' | |||
# Make sure the valves of '''all''' precursors inside the ALD tool are closed. | |||
# Run recipe '''chamber prep''' to pump out any residual gas in the gas lines. | |||
# Press the round '''VENT''' button. | |||
# Open the metal lid. | |||
# Put your sample inside, roughly in the center, away from the gas inlet and outlet. | |||
#: Check whether the rubber O-ring is properly seated. | |||
# Close the metal lid. Check that the lid is aligned to sit directly on top of the reactor chamber. | |||
# Press the round '''PUMP''' button. | |||
# Place the metal cage on top of the tool. | |||
# Open the H<sub>2</sub>0 valve. | |||
# Open relevant precursor valve. | |||
# Run your recipe. | |||
====Unloading==== | |||
# Close precursor valves. | |||
# Press the round '''VENT''' button. | |||
# Place the metal cage on the side of the tool. | |||
# Take out your sample. Check the rubber o-ring. | |||
# Press the round '''PUMP''' button. | |||
# Run recipe '''chamber_finalise'''. | |||
# Leave the system in the appropriate state. | |||
</div> | |||
===ALD2=== | |||
<div style="background-color: #c0c0c0; border: 1px solid #00000; padding: 10px; border-radius: 5px;"> | |||
====Loading==== | |||
# Log your process in the Excel notebook. | |||
# Check the nitrogen bottle: ''The indicators should be close to the designated values. If line pressure is ~0bar, contact the cleanroom staff.'' | |||
# Make sure the valves of '''all''' precursors inside the ALD tool are closed. | |||
# Run recipe '''chamber prep.txt''' to pump out any residual gas in the gas lines. | |||
# Press the '''VENT REACTOR''' button. | |||
# Open the metal lid. | |||
# Put your sample inside, roughly in the center, away from the gas inlet and outlet. | |||
#: Check whether the rubber O-ring is properly seated. | |||
# Close the metal lid. Check that the lid is aligned to sit directly on top of the reactor chamber. | |||
# Press the '''STOP VENTING''' button. | |||
# Press the '''PUMP REACTOR''' button. | |||
# Place the metal cage on top of the tool. | |||
# Open relevant precursor valve. | |||
# H<sub>2</sub>O is always open. | |||
# Run your recipe. | |||
====Unloading==== | |||
# Close precursor valve. | |||
# Press the '''VENT REACTOR''' button. | |||
# Place the metal cage on the wall. | |||
# Take out your sample. Check the rubber o-ring. | |||
# Press the '''STOP VENTING''' button. | |||
# Press the '''PUMP REACTOR''' button. | |||
# Run recipe '''chamber_finalise.txt'''. | |||
# Leave the system in the appropriate state. | |||
</div> | |||
== Growth per cycle (GPC) monitoring == | |||
<gallery mode="packed" widths=500 heights=200> | |||
Image:ALD1.png|ALD1 HfOx | |||
Image:ALD1AlOx.png|ALD1 AlOx | |||
Image:ALD2.png|ALD2 HfOx | |||
</gallery> | |||
==Recommended heater temperatures== | |||
These are the recommended temperatures from the [https://wiki.nbi.ku.dk/w/cleanroom/images/3/3e/Savannah_User_Manual.pdf manual]: | |||
{| class="wikitable" | |||
|- | |||
| '''Heaters for the trap (#6)''' || 150°C | |||
|- | |||
| '''Stop valve (#7)''' || 150°C | |||
|- | |||
| '''ALD valve oven (#10)''' || 150°C | |||
|- | |||
| '''Precursor Manifold''' || 150°C | |||
|- | |||
| '''Reactor heaters (#8 and #9) standard''' || 110°C | |||
|- | |||
| '''Reactor heaters (#8 and #9) range''' || 100-200°C | |||
|- | |||
|} | |||
== Witness samples == | |||
In CR1 and CR2, you can find various witness samples depending on the properties that you would like to explore: | |||
* Only thickness: Si (001) 1 inch wafers | |||
* Thickness and breakdown voltage: Si (001) 15x15 mm2 back-side Au plated | |||
It is recommended to ash the witness chips for 2 mins before loading them in the ALD tool. | |||
== File logs == | |||
* Recipe file location | * Recipe file location | ||
| Line 107: | Line 167: | ||
; What is the best plot time to graph the process pressure? | ; What is the best plot time to graph the process pressure? | ||
: It is recommended to plot only several pulses, for example 30 seconds or 1 minute total plot time. Setting this value to 1 hour during a run can reduce delay precision, because with a 1 hour plot time many data points need to be refreshed, which consumes a lot of processing resources. It is possible to set the plot time to 1 hour to get an overview of pulse heights, but plot times > 5 minutes are not recommended during a run. <ref>Savannah Maintenance Manual</ref> | : It is recommended to plot only several pulses, for example 30 seconds or 1 minute total plot time. Setting this value to 1 hour during a run can reduce delay precision, because with a 1 hour plot time many data points need to be refreshed, which consumes a lot of processing resources. It is possible to set the plot time to 1 hour to get an overview of pulse heights, but plot times > 5 minutes are not recommended during a run. <ref>Savannah Maintenance Manual</ref> | ||
[[Category:Tools]] | [[Category:Tools]] | ||
[[Category:Deposition]] | [[Category:Deposition]] | ||
Latest revision as of 15:07, 15 June 2026
 | |
| Essentials | |
|---|---|
| Full name | Savannah S100 (gen. 1) |
| Manufacturer | Cambridge NanoTech (Veeco) |
| Description | Atomic layer deposition system |
| Location | Cleanroom 1 (03.2.209A) Cleanroom 2 (03.2.203B) |
| Responsibility | |
| Primary | Harry |
| Secondary | Martin |
Page last updated: 15 Jun 2026
Two nearly identical Savannah S100-like systems are used for atomic layer deposition of aluminum, hafnium, titanium, zirconium, and oxide.
Other material deposition alternatives at the NBI cleanroom:
- AJA systems for sputtering/e-gun evaporation
- E-Gun evaporator
- Edwards thermal evaporator
- Leica sputter coater
- Molecular beam epitaxy system
Available processes
| Deposited material | Precursor | ALD1 | ALD2 | Ref. |
|---|---|---|---|---|
| Hafnium oxide (HfOx, HfO2) | TDMAH
tetrakis(dimethylamino)hafnium [(CH3)2N]4Hf  |
Yes | Yes | [1] |
| Aluminum oxide (AlOx, Al2O3) | TMA
trimethylaluminum (CH3)3Al  |
Yes | Yes | [2] |
| Titanium oxide (TiOx, TiO2) | TTIP
Titanium(IV) isopropoxide Ti[OCH(CH3)2]4  |
Yes | No | [3] |
| Zirconium oxide (ZrOx, ZrO2) | TDMAZ
Tetrakis(dimethylamido)zirconium(IV) [(CH3)2N]4Zr  |
No | Yes | [4] |
Videos on operating the tools
Video on how to operate ALD 1:
Video on how to operate ALD 2:
Standard Operating Procedure
ALD1
Loading
- Log your process in the Excel notebook.
- Check the nitrogen bottle: The indicators should be close to the designated values. If line pressure is ~0bar, contact the cleanroom staff.
- Make sure the valves of all precursors inside the ALD tool are closed.
- Run recipe chamber prep to pump out any residual gas in the gas lines.
- Press the round VENT button.
- Open the metal lid.
- Put your sample inside, roughly in the center, away from the gas inlet and outlet.
- Check whether the rubber O-ring is properly seated.
- Close the metal lid. Check that the lid is aligned to sit directly on top of the reactor chamber.
- Press the round PUMP button.
- Place the metal cage on top of the tool.
- Open the H20 valve.
- Open relevant precursor valve.
- Run your recipe.
Unloading
- Close precursor valves.
- Press the round VENT button.
- Place the metal cage on the side of the tool.
- Take out your sample. Check the rubber o-ring.
- Press the round PUMP button.
- Run recipe chamber_finalise.
- Leave the system in the appropriate state.
ALD2
Loading
- Log your process in the Excel notebook.
- Check the nitrogen bottle: The indicators should be close to the designated values. If line pressure is ~0bar, contact the cleanroom staff.
- Make sure the valves of all precursors inside the ALD tool are closed.
- Run recipe chamber prep.txt to pump out any residual gas in the gas lines.
- Press the VENT REACTOR button.
- Open the metal lid.
- Put your sample inside, roughly in the center, away from the gas inlet and outlet.
- Check whether the rubber O-ring is properly seated.
- Close the metal lid. Check that the lid is aligned to sit directly on top of the reactor chamber.
- Press the STOP VENTING button.
- Press the PUMP REACTOR button.
- Place the metal cage on top of the tool.
- Open relevant precursor valve.
- H2O is always open.
- Run your recipe.
Unloading
- Close precursor valve.
- Press the VENT REACTOR button.
- Place the metal cage on the wall.
- Take out your sample. Check the rubber o-ring.
- Press the STOP VENTING button.
- Press the PUMP REACTOR button.
- Run recipe chamber_finalise.txt.
- Leave the system in the appropriate state.
Growth per cycle (GPC) monitoring
-
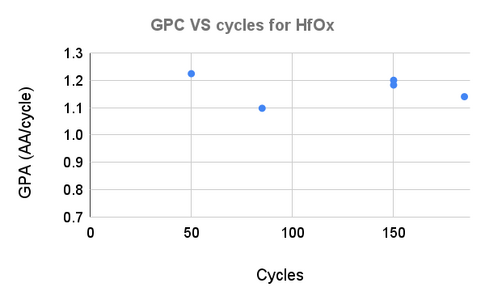 ALD1 HfOx
 -
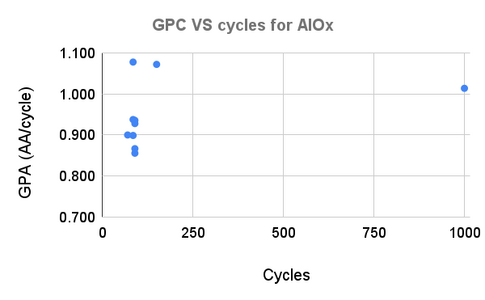 ALD1 AlOx
 -
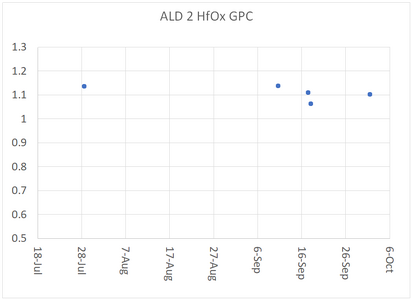 ALD2 HfOx


Recommended heater temperatures
These are the recommended temperatures from the manual:
| Heaters for the trap (#6) | 150°C |
| Stop valve (#7) | 150°C |
| ALD valve oven (#10) | 150°C |
| Precursor Manifold | 150°C |
| Reactor heaters (#8 and #9) standard | 110°C |
| Reactor heaters (#8 and #9) range | 100-200°C |
Witness samples
In CR1 and CR2, you can find various witness samples depending on the properties that you would like to explore:
- Only thickness: Si (001) 1 inch wafers
- Thickness and breakdown voltage: Si (001) 15x15 mm2 back-side Au plated
It is recommended to ash the witness chips for 2 mins before loading them in the ALD tool.
File logs
- Recipe file location
- ALD1: C:\Savannah\Users\Standard\
- ALD2: C:\Cambridge Nanotech\Recipes\
- Log file location
- ALD1: C:\ALD data. Includes pressure data, screenshot at termination.
- ALD2: C:\Cambridge Nanotech\Log\. Includes pressure and heater temperature data, screenshot at termination, software event logs.
Troubleshooting
- Pressure reading obviously wrong (above 1e3 Torr or below 1e-4 Torr)
- Pressure gauge failure. Unplug the network cable from the small square pressure gauge beneath the chamber and plug it back in. The pressure reading should return to expected values.
- No peak visible during precursor pulse
-
- Precursor valves closed. Make sure the relevant precursor valves are open. Consult the labels on the inside of the door.
- Pulse time too short. Select the lowest plotting interval and check whether you can spot a small peak when the automatic valve opens. Increase pulse time as needed.
- Cannot open lid upon venting
-
- Chamber pressure still below atmosphere. Confirm pressure reading in software. If pressure is below 5e2 Torr, check whether the nitrogen bottle valve is open.
- Rubber O-ring can get stuck to the lid. Gently but firmly lift the lid. Reseat the O-ring if needed.
- What is the best plot time to graph the process pressure?
- It is recommended to plot only several pulses, for example 30 seconds or 1 minute total plot time. Setting this value to 1 hour during a run can reduce delay precision, because with a 1 hour plot time many data points need to be refreshed, which consumes a lot of processing resources. It is possible to set the plot time to 1 hour to get an overview of pulse heights, but plot times > 5 minutes are not recommended during a run. [1]
References
- ↑ Savannah Maintenance Manual