Cambridge ALD: Difference between revisions
Jump to navigation
Jump to search
Created page with "{{Infobox tool |image = Tool ALD.jpg |toolfullname = TBD |website = TBD |company = TBD |description = TBD |location = TBD |primary = TBD |secondary = TBD |limits = TBD |comput..." |
No edit summary |
||
| (81 intermediate revisions by 5 users not shown) | |||
| Line 1: | Line 1: | ||
{{Infobox tool | {{Infobox tool | ||
|image = Tool ALD.jpg | |image = Tool ALD.jpg | ||
|toolfullname = | |toolfullname = Savannah S100 (gen. 1) | ||
|website = | |website = http://www.cambridgenanotechald.com/products/Savannah-ald-system.shtml | ||
|company = | |company = Cambridge NanoTech (Veeco) | ||
|description = | |description = Atomic layer deposition system | ||
|location = | |location = Cleanroom 1 (03.2.209A)<br />Cleanroom 2 (03.2.203B) | ||
|primary = | |primary = Harry | ||
|secondary = | |secondary = Martin | ||
}} | }} | ||
''Page last updated: 13 Aug 2026'' | |||
Two nearly identical Savannah S100-like systems are used for [[atomic layer deposition]] of '''aluminum''', '''hafnium''', '''titanium''', '''zirconium'''. | |||
In the [[knowledge database for ALD]] you can find more information about the recipes. | |||
Other material deposition alternatives at the [[Main Page|NBI cleanroom]]: | |||
* [[AJA systems]] for sputtering/e-gun evaporation | |||
* [[E-Gun evaporator]] | |||
* [[Leica sputter coater]] | |||
* [[MBE|Molecular beam epitaxy system]] | |||
== Available processes == | |||
{| class="wikitable" | |||
|- | |||
! Deposited material !! Precursor !! ALD1 !! ALD2 !! Ref. | |||
|- | |||
| Hafnium oxide (HfOx, HfO<sub>2</sub>) | |||
| <div class="toccolours mw-collapsible mw-collapsed width:400px" style="width:300px"> TDMAH <div class="mw-collapsible-content">tetrakis(dimethylamino)hafnium <br/> [(CH<sub>3</sub>)<sub>2</sub>N]<sub>4</sub>Hf <br/> [[File:TDMAH.png|246px]]</div></div> | |||
|style="background-color: #c6e0b4" | Yes || style="background-color: #c6e0b4" | Yes || [https://doi.org/10.1016/j.tsf.2005.05.050] | |||
|- | |||
| Aluminum oxide (AlOx, Al<sub>2</sub>O<sub>3</sub>) | |||
| <div class="toccolours mw-collapsible mw-collapsed" style="width:300px> TMA <div class="mw-collapsible-content">trimethylaluminum <br/> (CH<sub>3</sub>)<sub>3</sub>Al <br/> [[File:TMA.png|290px]]</div></div> | |||
|style="background-color: #c6e0b4" | Yes || style="background-color: #c6e0b4" | Yes || [https://doi.org/10.1134/1.1626763] | |||
|- | |||
| Titanium oxide (TiOx, TiO<sub>2</sub>) || <div class="toccolours mw-collapsible mw-collapsed" style="width:300px> TTIP <div class="mw-collapsible-content">Titanium(IV) isopropoxide <br/> | |||
Ti[OCH(CH<sub>3</sub>)<sub>2</sub>]<sub>4</sub><br/> [[File:TTIP.png|290px]]</div></div> | |||
|style="background-color: #c6e0b4" | Yes || style="background-color: #e0b4c6" | No || [https://pubs.acs.org/doi/full/10.1021/acs.jpcc.5b10529] | |||
|- | |||
| Zirconium oxide (ZrOx, ZrO<sub>2</sub>) || <div class="toccolours mw-collapsible mw-collapsed" style="width:300px> TDMAZ <div class="mw-collapsible-content">Tetrakis(dimethylamido)zirconium(IV) <br/> | |||
[(CH<sub>3</sub>)<sub>2</sub>N]<sub>4</sub>Zr<br/> [[File:CH32N4Zr.png|290px]]</div></div> | |||
|style="background-color: #e0b4c6" | No || style="background-color: #c6e0b4" | Yes || [https://www.osti.gov/servlets/purl/1763732] | |||
|} | |||
== Videos on operating the tools == | |||
Video on how to operate ALD 1: | |||
[[File:ALD1.mp4|500px]] | |||
* [https://youtu.be/Do91YRRgI34 Click here to watch the video on YouTube] | |||
Video on how to operate ALD 2: | |||
[[File:ALD2.mp4|500px]] | |||
* [https://www.youtube.com/watch?v=GmNEbyMNC4A Click here to watch the video on YouTube] | |||
== Standard Operating Procedure == | |||
===ALD1=== | |||
<div style="background-color: #c0c0c0; border: 1px solid #00000; padding: 10px; border-radius: 5px;"> | |||
====Loading==== | |||
# Log your process in the Excel notebook. | |||
# Check the nitrogen bottle: ''The indicators should be close to the designated values. If line pressure is ~0bar, contact the cleanroom staff.'' | |||
# Make sure the valves of '''all''' precursors inside the ALD tool are closed. | |||
# Run recipe '''0_default_setup''' to pump out any residual gas in the gas lines. | |||
# Press the round '''VENT''' button. | |||
# Open the metal lid. | |||
# Put your sample inside, roughly in the center, away from the gas inlet and outlet. | |||
#: Check whether the rubber O-ring is properly seated. | |||
# Close the metal lid. Check that the lid is aligned to sit directly on top of the reactor chamber. | |||
# Press the round '''PUMP''' button. | |||
# Place the metal cage on top of the tool. | |||
# Open the H<sub>2</sub>0 valve. | |||
# Open relevant precursor valve. | |||
# Run your recipe. | |||
====Unloading==== | |||
# Close precursor valves. | |||
# Press the round '''VENT''' button. | |||
# Place the metal cage on the side of the tool. | |||
# Take out your sample. Check the rubber o-ring. | |||
# Press the round '''PUMP''' button. | |||
# Run recipe '''0_default_setup'''. | |||
# Leave the system in the appropriate state. | |||
</div> | |||
===ALD2=== | |||
<div style="background-color: #c0c0c0; border: 1px solid #00000; padding: 10px; border-radius: 5px;"> | |||
====Loading==== | |||
# Log your process in the Excel notebook. | |||
# Check the nitrogen bottle: ''The indicators should be close to the designated values. If line pressure is ~0bar, contact the cleanroom staff.'' | |||
# Make sure the valves of '''all''' precursors inside the ALD tool are closed. | |||
# Run recipe '''0_default_setup.txt''' to pump out any residual gas in the gas lines. | |||
# Press the '''VENT REACTOR''' button. | |||
# Open the metal lid. | |||
# Put your sample inside, roughly in the center, away from the gas inlet and outlet. | |||
#: Check whether the rubber O-ring is properly seated. | |||
# Close the metal lid. Check that the lid is aligned to sit directly on top of the reactor chamber. | |||
# Press the '''STOP VENTING''' button. | |||
# Press the '''PUMP REACTOR''' button. | |||
# Place the metal cage on top of the tool. | |||
# Open relevant precursor valve. | |||
# H<sub>2</sub>O is always open. | |||
# Run your recipe. | |||
====Unloading==== | |||
# Close precursor valve. | |||
# Press the '''VENT REACTOR''' button. | |||
# Place the metal cage on the wall. | |||
# Take out your sample. Check the rubber o-ring. | |||
# Press the '''STOP VENTING''' button. | |||
# Press the '''PUMP REACTOR''' button. | |||
# Run recipe '''0_default_setup.txt'''. | |||
# Leave the system in the appropriate state. | |||
</div> | |||
== Growth per cycle (GPC) monitoring == | |||
<gallery mode="packed" widths=500 heights=200> | |||
Image:ALD1.png|ALD1 HfOx | |||
Image:ALD1AlOx.png|ALD1 AlOx | |||
Image:ALD2.png|ALD2 HfOx | |||
</gallery> | |||
==Recommended heater temperatures== | |||
These are the recommended temperatures from the [https://wiki.nbi.ku.dk/w/cleanroom/images/3/3e/Savannah_User_Manual.pdf manual]: | |||
===ALD1 heaters=== | |||
{| class="wikitable" | |||
|- | |||
| '''Heaters for the trap (#6)''' || 150°C | |||
|- | |||
| '''Stop valve (#7)''' || 150°C | |||
|- | |||
| '''ALD valve oven (#10)''' || 150°C | |||
|- | |||
| '''Precursor Manifold''' || 150°C | |||
|- | |||
| '''Reactor heaters (#8 and #9) standard''' || 110°C | |||
|- | |||
| '''Reactor heaters (#8 and #9) range''' || 100-200°C | |||
|- | |||
|} | |||
===ALD2 heaters=== | |||
{| class="wikitable" | |||
|- | |||
| '''Heaters for the trap (#6)''' || 150°C | |||
|- | |||
| '''Stop valve (#7)''' || 150°C | |||
|- | |||
| '''Precursor Manifold (#10)''' || 150°C | |||
|- | |||
| '''TDMAH and TDMAZ precursor heaters (#12 and #13)''' || 75°C | |||
|- | |||
| '''Reactor heaters (#8 and #9) standard''' || 110°C | |||
|- | |||
| '''Reactor heaters (#8 and #9) range''' || 100-200°C | |||
|- | |||
|} | |||
==Vacuum status== | |||
===ALD1=== | |||
''Tested 16 Jun 2026'' | |||
{| class="wikitable" | |||
|- | |||
! N<sub>2</sub> (sccm) !! Pressure (Torr) | |||
|- | |||
| 0|| 0.029 | |||
|- | |||
| 5 || 0.068 | |||
|- | |||
| 20 || 0.135 | |||
|- | |||
| 90 || 0.313 | |||
|- | |||
|} | |||
===ALD2=== | |||
''Tested 16 Jun 2026'' | |||
{| class="wikitable" | |||
|- | |||
! N<sub>2</sub> (sccm) !! Pressure (Torr) | |||
|- | |||
| 0|| 0.029 | |||
|- | |||
| 5 || 0.068 | |||
|- | |||
| 20 || 0.135 | |||
|- | |||
| 90 || 0.313 | |||
|- | |||
|} | |||
== Witness samples == | |||
In CR1 and CR2, you can find various witness samples depending on the properties that you would like to explore: | |||
* Only thickness: Si (001) 1 inch wafers | |||
* Thickness and breakdown voltage: Si (001) 15x15 mm2 back-side Au plated | |||
It is recommended to ash the witness chips for 2 mins before loading them in the ALD tool. | |||
== File logs == | |||
* Recipe file location | |||
*: ''ALD1'': ''C:\Savannah\Users\Standard\'' | |||
*: ''ALD2'': ''C:\Cambridge Nanotech\Recipes\'' | |||
* Log file location | |||
*: ''ALD1'': ''C:\ALD data''. Includes pressure data, screenshot at termination. | |||
*: ''ALD2'': ''C:\Cambridge Nanotech\Log\''. Includes pressure and heater temperature data, screenshot at termination, software event logs. | |||
== Troubleshooting == | |||
; Pressure reading obviously wrong (above 1e3 Torr or below 1e-4 Torr): | |||
: Pressure gauge failure. Unplug the network cable from the small square pressure gauge beneath the chamber and plug it back in. The pressure reading should return to expected values. | |||
; No peak visible during precursor pulse: | |||
:* Precursor valves closed. Make sure the relevant precursor valves are open. Consult the labels on the inside of the door. | |||
:* Pulse time too short. Select the lowest plotting interval and check whether you can spot a small peak when the automatic valve opens. Increase pulse time as needed. | |||
; Cannot open lid upon venting: | |||
:* Chamber pressure still below atmosphere. Confirm pressure reading in software. If pressure is below 5e2 Torr, check whether the nitrogen bottle valve is open. | |||
:* Rubber O-ring can get stuck to the lid. Gently but firmly lift the lid. Reseat the O-ring if needed. | |||
; What is the best plot time to graph the process pressure? | |||
: It is recommended to plot only several pulses, for example 30 seconds or 1 minute total plot time. Setting this value to 1 hour during a run can reduce delay precision, because with a 1 hour plot time many data points need to be refreshed, which consumes a lot of processing resources. It is possible to set the plot time to 1 hour to get an overview of pulse heights, but plot times > 5 minutes are not recommended during a run. <ref>Savannah Maintenance Manual</ref> | |||
[[Category:Tools]] | |||
[[Category:Deposition]] | |||
==References== | |||
Latest revision as of 15:16, 13 August 2026
 | |
| Essentials | |
|---|---|
| Full name | Savannah S100 (gen. 1) |
| Manufacturer | Cambridge NanoTech (Veeco) |
| Description | Atomic layer deposition system |
| Location | Cleanroom 1 (03.2.209A) Cleanroom 2 (03.2.203B) |
| Responsibility | |
| Primary | Harry |
| Secondary | Martin |
Page last updated: 13 Aug 2026
Two nearly identical Savannah S100-like systems are used for atomic layer deposition of aluminum, hafnium, titanium, zirconium.
In the knowledge database for ALD you can find more information about the recipes.
Other material deposition alternatives at the NBI cleanroom:
- AJA systems for sputtering/e-gun evaporation
- E-Gun evaporator
- Leica sputter coater
- Molecular beam epitaxy system
Available processes
| Deposited material | Precursor | ALD1 | ALD2 | Ref. |
|---|---|---|---|---|
| Hafnium oxide (HfOx, HfO2) | TDMAH
tetrakis(dimethylamino)hafnium [(CH3)2N]4Hf  |
Yes | Yes | [1] |
| Aluminum oxide (AlOx, Al2O3) | TMA
trimethylaluminum (CH3)3Al  |
Yes | Yes | [2] |
| Titanium oxide (TiOx, TiO2) | TTIP
Titanium(IV) isopropoxide Ti[OCH(CH3)2]4  |
Yes | No | [3] |
| Zirconium oxide (ZrOx, ZrO2) | TDMAZ
Tetrakis(dimethylamido)zirconium(IV) [(CH3)2N]4Zr  |
No | Yes | [4] |
Videos on operating the tools
Video on how to operate ALD 1:
Video on how to operate ALD 2:
Standard Operating Procedure
ALD1
Loading
- Log your process in the Excel notebook.
- Check the nitrogen bottle: The indicators should be close to the designated values. If line pressure is ~0bar, contact the cleanroom staff.
- Make sure the valves of all precursors inside the ALD tool are closed.
- Run recipe 0_default_setup to pump out any residual gas in the gas lines.
- Press the round VENT button.
- Open the metal lid.
- Put your sample inside, roughly in the center, away from the gas inlet and outlet.
- Check whether the rubber O-ring is properly seated.
- Close the metal lid. Check that the lid is aligned to sit directly on top of the reactor chamber.
- Press the round PUMP button.
- Place the metal cage on top of the tool.
- Open the H20 valve.
- Open relevant precursor valve.
- Run your recipe.
Unloading
- Close precursor valves.
- Press the round VENT button.
- Place the metal cage on the side of the tool.
- Take out your sample. Check the rubber o-ring.
- Press the round PUMP button.
- Run recipe 0_default_setup.
- Leave the system in the appropriate state.
ALD2
Loading
- Log your process in the Excel notebook.
- Check the nitrogen bottle: The indicators should be close to the designated values. If line pressure is ~0bar, contact the cleanroom staff.
- Make sure the valves of all precursors inside the ALD tool are closed.
- Run recipe 0_default_setup.txt to pump out any residual gas in the gas lines.
- Press the VENT REACTOR button.
- Open the metal lid.
- Put your sample inside, roughly in the center, away from the gas inlet and outlet.
- Check whether the rubber O-ring is properly seated.
- Close the metal lid. Check that the lid is aligned to sit directly on top of the reactor chamber.
- Press the STOP VENTING button.
- Press the PUMP REACTOR button.
- Place the metal cage on top of the tool.
- Open relevant precursor valve.
- H2O is always open.
- Run your recipe.
Unloading
- Close precursor valve.
- Press the VENT REACTOR button.
- Place the metal cage on the wall.
- Take out your sample. Check the rubber o-ring.
- Press the STOP VENTING button.
- Press the PUMP REACTOR button.
- Run recipe 0_default_setup.txt.
- Leave the system in the appropriate state.
Growth per cycle (GPC) monitoring
-
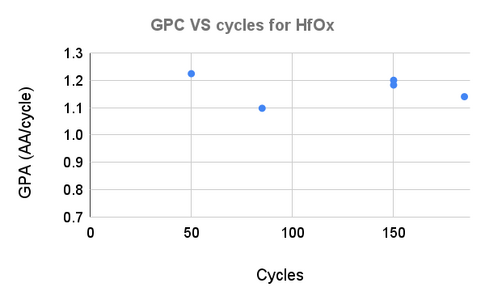 ALD1 HfOx
 -
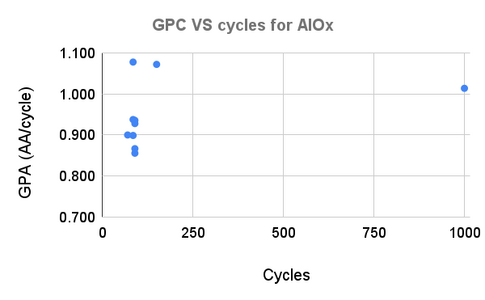 ALD1 AlOx
 -
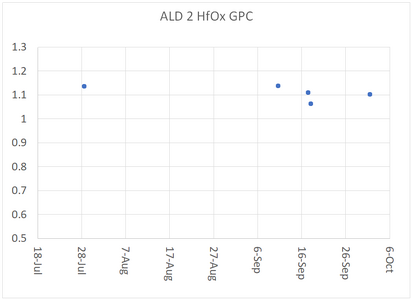 ALD2 HfOx


Recommended heater temperatures
These are the recommended temperatures from the manual:
ALD1 heaters
| Heaters for the trap (#6) | 150°C |
| Stop valve (#7) | 150°C |
| ALD valve oven (#10) | 150°C |
| Precursor Manifold | 150°C |
| Reactor heaters (#8 and #9) standard | 110°C |
| Reactor heaters (#8 and #9) range | 100-200°C |
ALD2 heaters
| Heaters for the trap (#6) | 150°C |
| Stop valve (#7) | 150°C |
| Precursor Manifold (#10) | 150°C |
| TDMAH and TDMAZ precursor heaters (#12 and #13) | 75°C |
| Reactor heaters (#8 and #9) standard | 110°C |
| Reactor heaters (#8 and #9) range | 100-200°C |
Vacuum status
ALD1
Tested 16 Jun 2026
| N2 (sccm) | Pressure (Torr) |
|---|---|
| 0 | 0.029 |
| 5 | 0.068 |
| 20 | 0.135 |
| 90 | 0.313 |
ALD2
Tested 16 Jun 2026
| N2 (sccm) | Pressure (Torr) |
|---|---|
| 0 | 0.029 |
| 5 | 0.068 |
| 20 | 0.135 |
| 90 | 0.313 |
Witness samples
In CR1 and CR2, you can find various witness samples depending on the properties that you would like to explore:
- Only thickness: Si (001) 1 inch wafers
- Thickness and breakdown voltage: Si (001) 15x15 mm2 back-side Au plated
It is recommended to ash the witness chips for 2 mins before loading them in the ALD tool.
File logs
- Recipe file location
- ALD1: C:\Savannah\Users\Standard\
- ALD2: C:\Cambridge Nanotech\Recipes\
- Log file location
- ALD1: C:\ALD data. Includes pressure data, screenshot at termination.
- ALD2: C:\Cambridge Nanotech\Log\. Includes pressure and heater temperature data, screenshot at termination, software event logs.
Troubleshooting
- Pressure reading obviously wrong (above 1e3 Torr or below 1e-4 Torr)
- Pressure gauge failure. Unplug the network cable from the small square pressure gauge beneath the chamber and plug it back in. The pressure reading should return to expected values.
- No peak visible during precursor pulse
-
- Precursor valves closed. Make sure the relevant precursor valves are open. Consult the labels on the inside of the door.
- Pulse time too short. Select the lowest plotting interval and check whether you can spot a small peak when the automatic valve opens. Increase pulse time as needed.
- Cannot open lid upon venting
-
- Chamber pressure still below atmosphere. Confirm pressure reading in software. If pressure is below 5e2 Torr, check whether the nitrogen bottle valve is open.
- Rubber O-ring can get stuck to the lid. Gently but firmly lift the lid. Reseat the O-ring if needed.
- What is the best plot time to graph the process pressure?
- It is recommended to plot only several pulses, for example 30 seconds or 1 minute total plot time. Setting this value to 1 hour during a run can reduce delay precision, because with a 1 hour plot time many data points need to be refreshed, which consumes a lot of processing resources. It is possible to set the plot time to 1 hour to get an overview of pulse heights, but plot times > 5 minutes are not recommended during a run. [1]
References
- ↑ Savannah Maintenance Manual