Olympus microscopes
 | |
| Essentials | |
|---|---|
| Full name | Olympus BX51M Olympus BX53M |
| Manufacturer | Olympus IMS |
| Description | Optical microscope |
| Location | Cleanroom 1 (03.2.209A) Cleanroom 2 (03.2.203B) |
| Responsibility | |
| Primary | Harry |
| Secondary | Nader |
There are Olympus BX metrology microscopes both in CR1 (BX51M) and CR2 (BX53M). They have feature parity and are equipped with 4K cameras and motorized Märzhäuser Wetzlar Tango stages. Objectives are 5x, 10x, 20x, 50x, 100x. Ultimate optical resolution (Rayleigh limit) of the 100x objective should be ~400 nm (at 550 nm wavelength).
There is also a Nikon microscope with a similar feature set in CR1.
If you want to resolve smaller features, you can use:
- JEOL JSM-7800F SEM
- Raith eLine SEM
- Philips TEM
If you want to resolve topographical features, you can use:
If you want to observe photoresist, insert the green filter at the back of the microscope body. Otherwise white light will expose your resist.
Usage rules
No booking is required, but please be flexible with regard to needs of other users.
The microscopes should be left with the light turned off or all the way down using the controls on the microscope body.
Do not leave samples on the stage or elsewhere in the working area, they might get discarded.
Save images you want to keep to Z drive, local files might get discarded.
How to: take an overview image
-
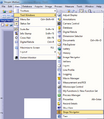
Stage Navigator toolbar should be at the top left of the Stream Motion software, above the overview image.
-
To enable Stage Navigator toolbar: View > Tool Windows > Stage Navigator.
Scanning the area
- Make sure the Stage Navigator toolbar is open.
- Click the left-most icon Define Overview Area.
- Follow the instructions on screen:
- Find the top-left of your area, press OK.
- Find the bottom-right of your area, press OK.
- The microscope will now automatically take and tile the images of the entire area defined by the two corners.
It is now possible to navigate the area by clicking on the overview image.
Saving the image
If you want to save the overview image:
- Right click on the overview image on the left > Open Overview Image
- File > Save As... (Ctrl+Shift+S)
- Select a filetype that suits your needs:
- Lossy (recommended for overview images):
- Recommended 85% quality JPEG (JFIF).
- High quality compression is imperceptible by human eye.
- Filesize can be some tens of megabytes.
- JPEG2000 provides 5-10x smaller filesizes but is not a universally compatible image format.
- Lossless:
- Recommended PNG or uncompressed TIFF.
- The filesize can easily be several hundred megabytes.
- LZW TIFF compression can reduce the size in half, but the microscope PC struggles with it.
- JPEG2000 provides lossless compression, but is not a universally compatible image format.
- Lossy (recommended for overview images):
- Save directly into Z drive.
Troubleshooting
- The corners of the image are dark (vignetting)!
- There is a mechanical spring that holds the microscope components together. It needs to be tightened by service. Please notify CR staff.
- For a temporary fix make a flatfield correction: Acquire > Devices > Device Settings > camera (UC90) > Shading Correction > Flatfield
- Everything is green!
- There is a green filter at the back of the microscope body. It is used to observe photoresist without exposing it.
- The image is completely black!
- Switch from eyepiece mode to camera mode (or vice versa) using a rod at the top of the microscope body.
- The overview image is all jumbled up!
- The axes of the motorized stage got inverted by the software gremlins. You can try to fix this or simply ask the CR staff.
- Try: reverse X/Y axes in Acquire > Device Settings > Marzhauser Tango
- The image is completely frozen!
- Turn on live imaging with the big button on the right side of the Stream Motion software.
- I can see a projection of the cleanroom lab in the image!
- Turn down the exposure/gain in the software and increase the light using the knob on the microscope body.
- The hand controller is not moving the stage!
- Verify that the install Märzhäuser Tango control software is installed.
Remote access
- TeamViewer: SCOPE1, SCOPE2
- LogMeIn: Scope 1 (CR1) [OSIS-CR1Olympus], SCOPE2 (CR2)

