Bruker Dimension Icon AFM: Difference between revisions
No edit summary |
No edit summary |
||
| (12 intermediate revisions by 3 users not shown) | |||
| Line 4: | Line 4: | ||
|company = Bruker | |company = Bruker | ||
|description = Atomic Force Microscope | |description = Atomic Force Microscope | ||
|location = K08 | |website = https://www.bruker.com/en/products-and-solutions/microscopes/materials-afm/dimension-icon-afm.html | ||
|primary = | |location = Characterization room (03.01.K08) | ||
|secondary = | |primary = Nikki | ||
|secondary = Zhe | |||
|limits = None | |limits = None | ||
}} | }} | ||
Bruker Dimension Icon is an atomic force microscope used for accurate surface topography measurements. | |||
Users can measure film thickness, roughness and other topographical data characteristics with Ångstrom accuracy. | |||
== Quick | Other alternatives for surface characterization at the [[Main Page|NBI cleanroom]] facilities: | ||
* Open the enclosure | * [[Tencor profilometer]] for step height and profile roughness | ||
* | * [[Alpha-SE ellipsometer]] for transparent film overall thickness and roughness | ||
* | * [[Filmetrics reflectometer]] for transparent film overall thickness and roughness | ||
* | * [[JEOL 7800F]] SEM for film thickness by observing material cross-sections, elemental analysis | ||
*: | == '''Quick-Start Instruction Manual for ScanAsyst Operation''' == | ||
*: Make sure | '''Before You Begin''' | ||
*: | * Complete and pass AFM training by NBI-Cleanroom staff. | ||
* | '''Before Your Session''' | ||
* Make sure your sample is ready. | |||
* Book your session in advance and be on time. | |||
'''During Your Session''' | |||
'''Laboratory Reminders''' | |||
* Wear shoe covers in the lab. | |||
* Wear nitrile gloves before touching the tool. | |||
* Keep the workstation clean and tidy. | |||
* Make sure both main and support PCs are ON. | |||
* Ensure AFM (Nanoscope 9.7) software is closed before starting. This ensures the laser is OFF. | |||
* Check if a tip is already mounted. Use logbook (AFM Log) on the support PC to confirm. | |||
* If needed, load or change the tip (see next section). | |||
'''Unloading the Tip Holder from the Scan Head''' | |||
* Open the AFM enclosure. | |||
* Make sure the scan head is up, and the sample stage is not directly under. | |||
* Loosen the side screw a few turns to release the scan head. 📍Do not remove the screw. | |||
* Slide the scan head out of the dovetail groove and hold it carefully. | |||
* Gently pull out the tip holder from the bottom of the scanner. | |||
* Slide the scan head back into the dovetail groove. Keep holding until it is fully seated at the bottom of the groove. | |||
* Mount the tip holder on the loading station. The loading station is a black, round block with 3 sets of probe-mounting slots. | |||
* Place the loading station on the table. | |||
'''Mounting the Tip''' | |||
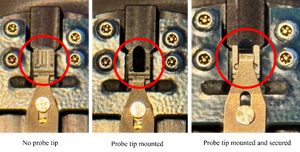
* Pick the right tip for your scan. Tip specifications can be found on the Gel-Pak box. The default tip for ScanAsyst mode is “ScanAsyst Air”. The tip holder looks like a small circuit board with 4-holes and a metal clip to hold the tip in position. | |||
* Gently press down and slide the metal clip to the back until the groove (slot for the tip) is fully visible. | |||
* Remove the old tip from the holder. Discard by placing it in a Gel-Pak box (aligning the tip horizontally). | |||
* Use tweezers to carefully lift a new tip (by its side) from the Gel-Pak box. New tips are aligned vertically in the Gel-Pak box. 📍Do not flip or drop the tip! | |||
* Gently place the tip into the groove. Make sure it sits neatly in the groove with the cantilever at the open end of the groove. | |||
* Gently press down and slide the metal clip to the front until it locks the tip in place. | |||
[[File:Figure-tip.png|thumb]] | |||
'''Loading the Tip onto the Scan Head''' | |||
* Slide the scan head out of the dovetail groove and hold it carefully. | |||
* Connect the tip holder to the bottom of the scanner. Align the 4 pins to the matching sockets and press it gently but firmly. Make sure the tip is facing downwards. | |||
* Slide the scan head back into the dovetail groove. Keep holding until it is fully seated at the bottom of the groove. | |||
* Tighten the screw to lock the scan head. 📍Do not overtighten. | |||
'''Starting Your AFM Session''' | |||
'''Launching the Software''' | |||
* Open Nanoscope 9.7 on the desktop. | |||
* Wait for the Dimension Icon window to load and automatically pop up. | |||
Choosing Your Experiment Settings | |||
* By default, the “ScanAsyst in Air” experiment is selected so you can directly click “Load Experiment”. You will hear a sound, and the laser will activate (red LED lights up). | |||
'''SETUP Tab''' | |||
Adjust the illumination and zoom until the tip is visible on the screen. If you do not see the cantilever even at the lowest magnification, you may need to reposition the tip holder or replace the tip. | |||
'''Probe Setup''' | |||
* Check that the ScanAsyst-Air probe parameters are selected. Otherwise, choose the ScanAsyst-Air probe from the database. | |||
'''Aligning the Laser''' | |||
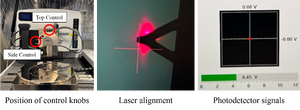
* Click “Move to the Alignment Station”. | |||
* Use the top X-Y control knobs on the scanner to align the laser to the tip. Adjust the laser spot until the sum photodetector signal is at least 3.5V. | |||
* Use the side X-Y control knobs on the scanner to align the laser at the center of the photodetector. Adjust the laser to center the red dot on the crosshair. Aim for ~ 0V offset on both axes but below 0.2V is acceptable. | |||
[[File:Figure-laser.png|thumb]] | |||
'''Focusing the Tip''' | |||
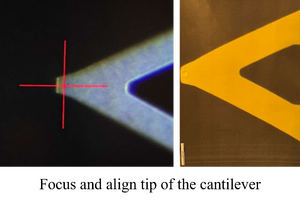
* Click “Return from Alignment Station”. | |||
* Use the Focus Controls (Up/Down arrows) to focus the tip of the cantilever. | |||
* Adjust the illumination, zoom and focus until the tip image is sharp. | |||
* Click near the tip apex (~ 7 µm) to mark the cantilever position. | |||
[[File:Figure-cantilever.png|thumb]] | |||
'''NAVIGATE Tab''' | |||
'''Loading the Sample''' | |||
* Make sure the stage is at “Sample Load Position”. | |||
* Place your sample on the stage and turn on the vacuum. | |||
* Use trackball or on-screen controls to move the sample under the tip. | |||
* If you already scanned a sample before changing the tip and did not close the software, you can click “Sample Scan Position” to return to your previous scan position. | |||
'''Focusing the Sample''' | |||
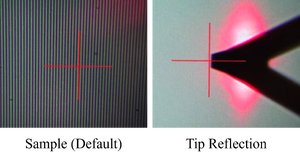
* Choose “Sample (Default)” focus method if your sample has features, like lithography on the surface, you can use to identify the surface plane. Choose “Tip Reflection” for thin films. | |||
* Use a low-speed setting. | |||
* Use the Up/Down arrows (start with the Down arrow) to bring the sample into focus. For tip reflection, the mirror image of the cantilever should be brought into focus. | |||
* Adjust the illumination, zoom and focus until the sample looks sharp and clear. 📍 Focus gradually to avoid tip crash. Moving too fast may break the tip! | |||
* Close the AFM enclosure when done. | |||
[[File:Figure-focus.png|thumb]] | |||
'''Check Parameters''' | |||
* Before scanning, confirm the basic scan settings (for standard use). | |||
** Scan size: 500 nm | |||
** Aspect ratio: 1.00 | |||
** X offset / Y offset: 0.000 nm | |||
** Scan angle. 0.00° | |||
** Scan rate: 1 Hz | |||
** Samples per line: 256 | |||
** Spring constant: 0.4000 N/m | |||
** Do not change other settings unless agreed with NBI-Cleanroom staff. | |||
'''Engaging the Tip''' | |||
* Click “Engage” to lower the tip and start scanning. | |||
'''Scanning & Data Collection''' | |||
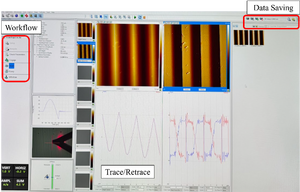
* Monitor the Trace/Retrace lines in the Scope window. They should have similar shapes but not necessarily overlapping. Assess whether the features look physical or noise-like. | |||
* Increase the scan size in steps (2 µm, 10 µm, 50 µm, 90 µm) until you see the area of interest. Use the zoom or offset tool to center and choose scan direction. | |||
* Before moving to other areas, click “Withdraw” to safely lift the tip. | |||
* Click “Engage” again when ready for a new scan. | |||
📍The tip must be retracted before any stage movement. | |||
'''Saving Your Data''' | |||
* Go to: | |||
Capture > Capture Filename > Change Directory > Rename File > OK | |||
* Choose: | |||
** Capture - captures a single scan | |||
** Capture Continuous - captures every scan | |||
** Capture Now - immediately captures whatever has been scanned since the beginning of the frame. | |||
** Stop Capture - aborts the capture action. | |||
[[File:Figure-software.png|thumb]] | |||
'''Ending Your Session''' | |||
* Click “Withdraw” to safely lift the tip. | |||
* Click “Navigate”, then “Sample Load Position”. | |||
* Open the AFM enclosure. | |||
* Turn off the vacuum and remove your sample. | |||
Tip Condition: | |||
If the tip is broken, replace and align it before ending your session. | |||
If the tip is still usable, exit Nanoscope 9.7 software (laser turns off). | |||
* Close Nanoscope 9.7 on the desktop. | |||
* Close the AFM enclosure. | |||
* Copy your data and fill in the session log. | |||
* Clean up the workspace and dispose used items properly. | |||
'''💡Questions?''' | |||
For help with scan settings and data analysis, contact NBI-Cleanroom staff. | |||
[[Category:Tools]] | |||
[[Category:Characterization]] | |||
Latest revision as of 15:53, 27 January 2026
| Essentials | |
|---|---|
| Full name | Dimension Icon PT |
| Manufacturer | Bruker |
| Description | Atomic Force Microscope |
| Location | Characterization room (03.01.K08) |
| Responsibility | |
| Primary | Nikki |
| Secondary | Zhe |
Bruker Dimension Icon is an atomic force microscope used for accurate surface topography measurements. Users can measure film thickness, roughness and other topographical data characteristics with Ångstrom accuracy.
Other alternatives for surface characterization at the NBI cleanroom facilities:
- Tencor profilometer for step height and profile roughness
- Alpha-SE ellipsometer for transparent film overall thickness and roughness
- Filmetrics reflectometer for transparent film overall thickness and roughness
- JEOL 7800F SEM for film thickness by observing material cross-sections, elemental analysis
Quick-Start Instruction Manual for ScanAsyst Operation
Before You Begin
- Complete and pass AFM training by NBI-Cleanroom staff.
Before Your Session
- Make sure your sample is ready.
- Book your session in advance and be on time.
During Your Session
Laboratory Reminders
* Wear shoe covers in the lab.
* Wear nitrile gloves before touching the tool.
* Keep the workstation clean and tidy.
* Make sure both main and support PCs are ON.
* Ensure AFM (Nanoscope 9.7) software is closed before starting. This ensures the laser is OFF.
* Check if a tip is already mounted. Use logbook (AFM Log) on the support PC to confirm.
* If needed, load or change the tip (see next section).
Unloading the Tip Holder from the Scan Head
- Open the AFM enclosure.
- Make sure the scan head is up, and the sample stage is not directly under.
- Loosen the side screw a few turns to release the scan head. 📍Do not remove the screw.
- Slide the scan head out of the dovetail groove and hold it carefully.
- Gently pull out the tip holder from the bottom of the scanner.
- Slide the scan head back into the dovetail groove. Keep holding until it is fully seated at the bottom of the groove.
- Mount the tip holder on the loading station. The loading station is a black, round block with 3 sets of probe-mounting slots.
- Place the loading station on the table.
Mounting the Tip
- Pick the right tip for your scan. Tip specifications can be found on the Gel-Pak box. The default tip for ScanAsyst mode is “ScanAsyst Air”. The tip holder looks like a small circuit board with 4-holes and a metal clip to hold the tip in position.
- Gently press down and slide the metal clip to the back until the groove (slot for the tip) is fully visible.
- Remove the old tip from the holder. Discard by placing it in a Gel-Pak box (aligning the tip horizontally).
- Use tweezers to carefully lift a new tip (by its side) from the Gel-Pak box. New tips are aligned vertically in the Gel-Pak box. 📍Do not flip or drop the tip!
- Gently place the tip into the groove. Make sure it sits neatly in the groove with the cantilever at the open end of the groove.
- Gently press down and slide the metal clip to the front until it locks the tip in place.
Loading the Tip onto the Scan Head
- Slide the scan head out of the dovetail groove and hold it carefully.
- Connect the tip holder to the bottom of the scanner. Align the 4 pins to the matching sockets and press it gently but firmly. Make sure the tip is facing downwards.
- Slide the scan head back into the dovetail groove. Keep holding until it is fully seated at the bottom of the groove.
- Tighten the screw to lock the scan head. 📍Do not overtighten.
Starting Your AFM Session
Launching the Software
- Open Nanoscope 9.7 on the desktop.
- Wait for the Dimension Icon window to load and automatically pop up.
Choosing Your Experiment Settings
- By default, the “ScanAsyst in Air” experiment is selected so you can directly click “Load Experiment”. You will hear a sound, and the laser will activate (red LED lights up).
SETUP Tab
Adjust the illumination and zoom until the tip is visible on the screen. If you do not see the cantilever even at the lowest magnification, you may need to reposition the tip holder or replace the tip.
Probe Setup
- Check that the ScanAsyst-Air probe parameters are selected. Otherwise, choose the ScanAsyst-Air probe from the database.
Aligning the Laser
- Click “Move to the Alignment Station”.
- Use the top X-Y control knobs on the scanner to align the laser to the tip. Adjust the laser spot until the sum photodetector signal is at least 3.5V.
- Use the side X-Y control knobs on the scanner to align the laser at the center of the photodetector. Adjust the laser to center the red dot on the crosshair. Aim for ~ 0V offset on both axes but below 0.2V is acceptable.
Focusing the Tip
- Click “Return from Alignment Station”.
- Use the Focus Controls (Up/Down arrows) to focus the tip of the cantilever.
- Adjust the illumination, zoom and focus until the tip image is sharp.
- Click near the tip apex (~ 7 µm) to mark the cantilever position.
NAVIGATE Tab
Loading the Sample
- Make sure the stage is at “Sample Load Position”.
- Place your sample on the stage and turn on the vacuum.
- Use trackball or on-screen controls to move the sample under the tip.
- If you already scanned a sample before changing the tip and did not close the software, you can click “Sample Scan Position” to return to your previous scan position.
Focusing the Sample
- Choose “Sample (Default)” focus method if your sample has features, like lithography on the surface, you can use to identify the surface plane. Choose “Tip Reflection” for thin films.
- Use a low-speed setting.
- Use the Up/Down arrows (start with the Down arrow) to bring the sample into focus. For tip reflection, the mirror image of the cantilever should be brought into focus.
- Adjust the illumination, zoom and focus until the sample looks sharp and clear. 📍 Focus gradually to avoid tip crash. Moving too fast may break the tip!
- Close the AFM enclosure when done.
Check Parameters
- Before scanning, confirm the basic scan settings (for standard use).
- Scan size: 500 nm
- Aspect ratio: 1.00
- X offset / Y offset: 0.000 nm
- Scan angle. 0.00°
- Scan rate: 1 Hz
- Samples per line: 256
- Spring constant: 0.4000 N/m
- Do not change other settings unless agreed with NBI-Cleanroom staff.
Engaging the Tip
- Click “Engage” to lower the tip and start scanning.
Scanning & Data Collection
- Monitor the Trace/Retrace lines in the Scope window. They should have similar shapes but not necessarily overlapping. Assess whether the features look physical or noise-like.
- Increase the scan size in steps (2 µm, 10 µm, 50 µm, 90 µm) until you see the area of interest. Use the zoom or offset tool to center and choose scan direction.
- Before moving to other areas, click “Withdraw” to safely lift the tip.
- Click “Engage” again when ready for a new scan.
📍The tip must be retracted before any stage movement.
Saving Your Data
- Go to:
Capture > Capture Filename > Change Directory > Rename File > OK
- Choose:
- Capture - captures a single scan
- Capture Continuous - captures every scan
- Capture Now - immediately captures whatever has been scanned since the beginning of the frame.
- Stop Capture - aborts the capture action.
Ending Your Session
- Click “Withdraw” to safely lift the tip.
- Click “Navigate”, then “Sample Load Position”.
- Open the AFM enclosure.
- Turn off the vacuum and remove your sample.
 Tip Condition:
 If the tip is broken, replace and align it before ending your session.
 If the tip is still usable, exit Nanoscope 9.7 software (laser turns off).
- Close Nanoscope 9.7 on the desktop.
- Close the AFM enclosure.
- Copy your data and fill in the session log.
- Clean up the workspace and dispose used items properly.
💡Questions?
For help with scan settings and data analysis, contact NBI-Cleanroom staff.