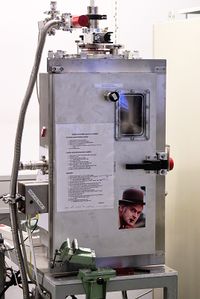
E-Gun evaporator
 | |
| Essentials | |
|---|---|
| Full name | E-Gun evaporator |
| Manufacturer | Homemade |
| Description | Electron beam physical vapor deposition system |
| Location | HCØ 03.2.213 |
| Manual | Guide to Egun chamber |
| Responsibility | |
| Primary | Nader |
| Secondary | Shiv |
Overview
The e-gun evaporator, also known as Egon, is a homegrown electron beam physical vapor deposition system.
Operating instructions
Unloading sample/Venting loadlock
Prerequisites:
- Sample holder must be in the top position
- The gate valve (GV) must be closed
- The sample valve (SV) to the roughing pump must be closed
Then:
- Open vent valve on loadlock (LL). The pressure gauge for the LL should now read about 760 Torr or or (over range)
- Remove the sample holder
Loading sample/pumping down the loadlock
- Mount the sample on the holder and secure the holder in the top position
- Close the vent valve
- Close the roughing pump valve (RV). A warning signal for close RV starts
- Open the sample valve (SV). Watch the LL pressure on the gauge.
- When the LL pressure is < 8×10⁻² torr, open RV again
- When the LL pressure is < 5×10⁻² torr, close SV. Watch for a fast rise in the LL pressure! This is a sign of a leak.
- Open GV before LL pressure rises to > 8×10⁻² torr
- Gently lower the sample holder into the chamber
Deposition
- Chamber pressure must be below 1×10⁻⁶ torr before starting
- Choose material on index wheel on the right side of the chamber
- Turn on the power supply (PS); Push all breakers down from left to right
- On remote control in cleanroom turn key to "Man"
- Turn on GV and set to about 6 kV
- Turn on emission and adjust slowly to desired value (typically 0.05-0.15 A)
- Open viewport shutter and center beam in crucible using XY controls. Close it as soon as material heats up to prevent coating of viewport
- Turn sample shutter to position "Xtal open" to expose rate monitor
- Adjust emission to give the desired rate in A/s
- Open sample shutter fully to begin deposition on sample
- When dersired thickness is reached, set sample shutter to position "Closed"
- Turn down emission and turn off
- Turn down HV and turn off
- Wait until material cools before durning the index wheel to the next material. For another deposition, return to point 5
- Set key to "Safe"
- Turn off power supply; Pull up all four breakers from right to left
Opening the chamber for service
Venting the chamber
- Turn off ion gauge and HV power supply
- Turn of turbopump on control by pushing "On/off"
- Wait 10 minutes for pump speed to run down
- Close roughing valve (RV)
- Vent pump and chamber on small vent valve (black knob) on top of turbo pump. Read the pressure on high range pressure gauge. The pressure gauge will read about 760 torr or "or" (over range) when the chamber is ready for opening.
Pumping down the chamber
- Close the door
- Close the vent valve on turbopump
- Open roughing valve (RV)
- When the chamber pressure is below 8×10⁻² torr, turn on turbo pump by pressing "On/off". When the turbo is at full speed, the display reads 825-833 Hz.
- When the chamber pressure is below 5×10⁻⁴ torr, turn on the ion gauge